
Flames of war trees

How to make trees for 15mm (Flames of War)
Scale
How big is a tree? Up to 20 meters if you look around. A 15 mm figure represents a man of 2 meters (say), so with base, being kind, say the figures come to 2cm. ie 1cm=1meter for model making. This means a 20m high mature tree should be 20 cm high - which frankly looks wrong on a war gaming table.
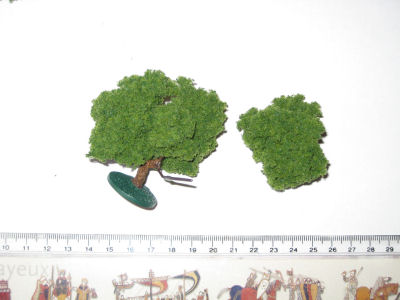
So, how big should the tree be? Personally I go for trees between 5 and 8 cm, which is not to scale, but looks good and doesn't get in the way of the game.
How long does it take
I make trees over many days, in 10 or 20 minute sessions. This fits with my time commitments, and allows me to have a process which has lots of breaks for drying. I tend to do 4 or 5 at a time, and once I have 20 or so I imagine I will never again make any trees.
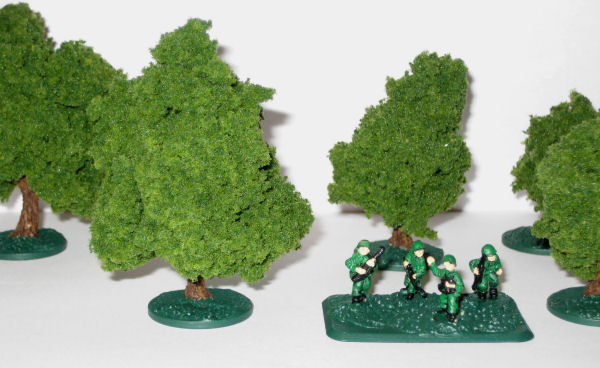
The End Result

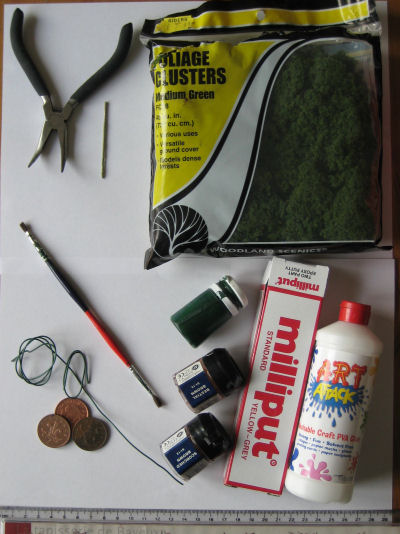
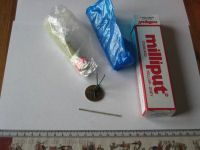
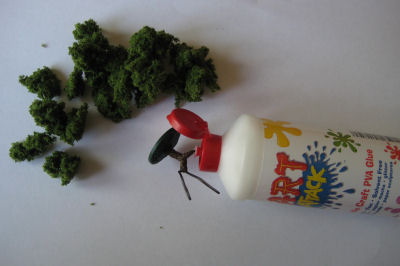
Step1: Materials
 To
make the tree you need this stuff, and also a pen knife, which is not
shown.
To
make the tree you need this stuff, and also a pen knife, which is not
shown.
I experimented with how to make leaves, and nothing worked as well as model train foliage clusters. A bag is a bit pricey but worth it.
Gardening wire is used for the trunk and the support for the foliage.
Milliput modelling clay is used to base the tree, and make the trunk. I've used this for years and it remains my staple.
Green paint for the base, two shades of brown (or mix your own) for base painting the trunk and then dry brushing afterwards.
Coins are used as the base.
PVA glue is used to stick the foliage to the branches, but more importantly to add extra clusters to fill in any gaps at the end.
Time: only minutes
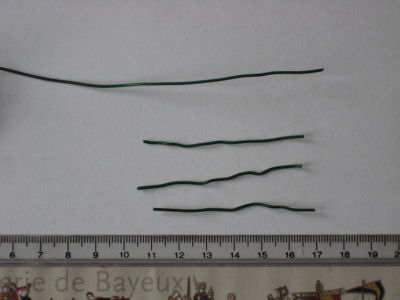
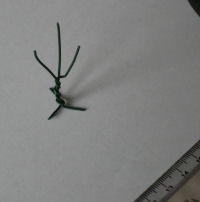
Step 2 - the wire cutting
 The
wires are twisted to form the trunk, with the remainder having foliage
clusters pushed onto them.
The
wires are twisted to form the trunk, with the remainder having foliage
clusters pushed onto them.
Three per tree is perfect, but more can be used if you want more branches.
The wires to the left were for a small tree. Try this for wire length:
Hight of tree + 1cm for base, +1 cm for twist.
You can always trim the wires if they are too long.
Time: minutes again
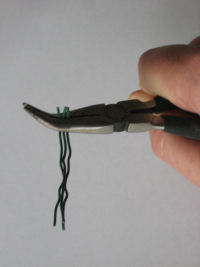
Step 3- making the wire frame.
 I
hold the wires so just over a cm is going to remain straight - this forms
the base.
I
hold the wires so just over a cm is going to remain straight - this forms
the base.
You then plat the wires - grab the outside wire and bend it around the other two until back to the starting point, then swap sides, and bend that wire around. Once you have done a couple of twists you can use thumb and finger to twist both wires around the central one.
Doing it is easier than describing it.
This twisted section forms the trunk. With 4 wires you can create a fork etc.
Time: about 10 minutes a tree, and then a 3 hour gap at leasst
Step 4 - basing the tree
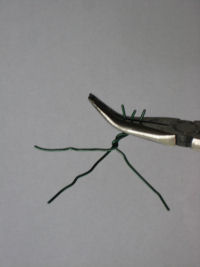
 Bend
the wire at the base so they fan out.
Bend
the wire at the base so they fan out.
You now need the milliput, a pen knife to cut some milliput off, I use an old, large needle to act as a 'dibber' - creating dimples in the base.
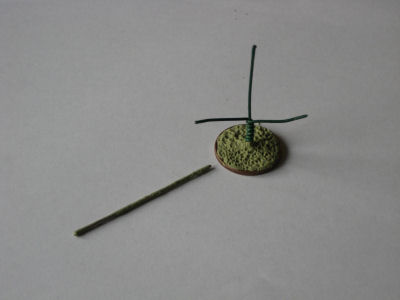 Use
the milliput to smooth over the wires, and so secure it to the base -
milliput is very sticky and so this works.
Use
the milliput to smooth over the wires, and so secure it to the base -
milliput is very sticky and so this works.
The large needle is gently pushed into the milliput to make the dips in the ground. This is very rough and ready and if you prefer to use flock or stones, or ... for basing then you can forget about this.
The disadvantage of my dimpled bases is they use more paint up - the advantage for me is that I don't then have to glue on grass etc to get some texture. I can do that if I ever have the time, but I don't have to.
Time: probably 15 minutes per tree, a short drying time is required.
Step 5 - the trunk, and painting.
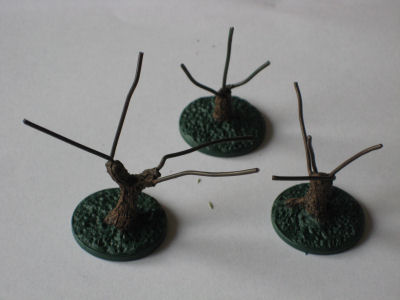 I'm
currently doing the trunk after doing the base, ie letting the base dry
first. But there is no need to do that.
I'm
currently doing the trunk after doing the base, ie letting the base dry
first. But there is no need to do that.
Use milliput over the wire of the trunk to smooth it out, then score it with tiny cuts from the end of a penknife. This creates bark texture - again, no need for precision. My trees are for overall effect on a gaming table and are not works of art in themselves.
After that, paint the base - I just use a single colour.
The trunk I base paint dark brown. When dry I then dry brush over it in a lighter shade.
Dry brushing just means you dip the brush in the paint, then wipe it on a piece of paper to get rid of most of the paint, then brush over the surface of the bark. Some paint comes off, but it doesn't run into indentations in the tree/soldier etc. You end up painting on the models highlights.
You can see one 4 wire tree with a fork in this image.
Time: once you have done a couple, about 5 minutes a tree
Step 6 - glue on the main foliage
 Stick
the branch into the PVA so it is covered.
Stick
the branch into the PVA so it is covered.
Then, have foliage clusters ready, about the same size, which are higher than wide - they should be 'total tree hight - hight of trunk and base'. I don't measure, you can see. Or, they could be slightly higher than the wire left for the 'branch'.
Try it and you will get the hang of it.
 Here
is the tree with two foliage clusters pushed onto two branches, which
were first dipped in PVA. The third cluster is about to be impaled.
Here
is the tree with two foliage clusters pushed onto two branches, which
were first dipped in PVA. The third cluster is about to be impaled.
I usually start by spreading the branches out - so they are as far apart as possible.
Only when all the clusters are on do I push them together.
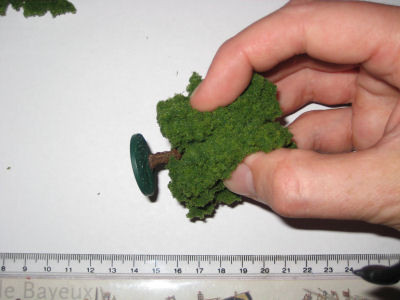 This
is where the gardening wire comes into its own. By squeezing the wire
inwards, you compress the foliage clusters, and this hides the join between
them.
This
is where the gardening wire comes into its own. By squeezing the wire
inwards, you compress the foliage clusters, and this hides the join between
them.
If you are luckier than me, you could simply use a single foliage cluster and it would all work out. I tried this and ended up with an unsightly tree.
This method of three (or more) clusters stuck on the branches, and then compressing by bending the branches back together works well.
But, it can leave a gap or two.
Time: 5 minutes to do, but then LET IT DRY. So a good couple of hours at least.
Step 7 - filling in the gaps, and shaping.
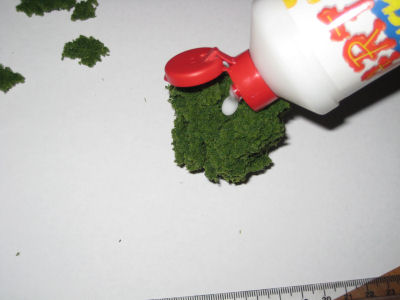 Sometimes
there will be a gap, tear off a small foliage clsuter, fill the gap with
PVA, and push in the cluster, and then LET IT DRY!
Sometimes
there will be a gap, tear off a small foliage clsuter, fill the gap with
PVA, and push in the cluster, and then LET IT DRY!
Once it is all dry, maybe a day later, with a fresh eye, shape the tree by tearing off any bits of foliage that stick out.
And that is that.
(Flash was a bit bright....)